Hello everyone! So, I’m starting a new adventure, and I am having a lot of fun with it. I have found myself being drawn to image stamps for a long time now, and I held off because I didn’t want another thing to spend money on. Well, that didn’t work, but I tried!
Disclaimer: I have never taken a class and I do not profess myself to be an expert, nor do I think you have to be. That being said, if the powers that be at Copic ever come across this, please schedule a class in the South! Like, Nashville or Birmingham please. Thank you.


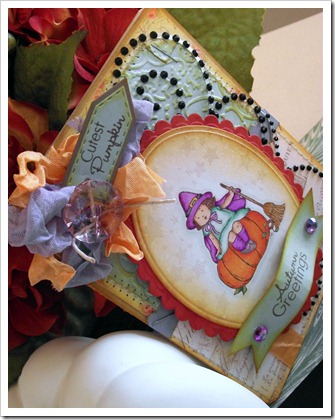
I think it is kind of hard to give a step-by-step description of the making of this card, so I’ll be doing it a little differently this time. I still kind of struggle with that.
I started with the cutest image from Stampin’ Up’s Greeting Card Kids stamp set. I have eyed this set since I started stamping, and I am so happy to finally have it. Because I am easing my way into coloring, I used a variety of markers for this project. I *think* that I will be buying the Copic Sketch markers. I am researching my options. I might stick with Prismacolors. Anyway, for this card, here are the markers I used:
Pumpkin
Prismacolor PM-15 Yellowed Orange, PM-16 Orange & PM-13 Poppy Red
Dress
Prismacolor PM-193 Mint Cream, Pm-166 True Green, PM-32 Parrot Green & Copic Sketch B000 Pale Porcelain Blue
Cape, Hat & Socks
BIC Mark-It Polynesian Purple, Prismacolor PM-55 Rhodamine & PM-50 Violet
Hat Band & Buckle
BIC Mark-It Cloud Nine Grey, Tuxedo Black & Prismacolor PM-123 Spanish Orange
Hair
BIC Mark-It Tiki Hut Tan, Prismacolor PM-69 Goldenrod & PM-98 Dark Brown
Skin
Prismacolor PM-72 Eggshell, PM-170 Peach & PM-65 Sienna Brown
Broom, Leaves & Branch
PM-166 True Green & PM-31 Dark Green, BIC Mark-It Tiki Hut Tan, Prismacolor PM-69 Goldenrod & PM-123 Spanish Orange
Shading
Copic Sketch Warm Gray No. 1, B000 Pale Porcelain Blue & Colorless Blender
The card base is 4” x 5.5.” Yes, I trimmed it because I felt it was a little bit too wide. The card base is Kraft and the patterned papers are from Pink Paislee’s London Market 6” x 6” paper pack. I stamped the image with Memento Rich Cocoa Ink onto Stamper’s Select White cardstock. I diecut it with my Spellbinders Petite Ovals Small dies and inked it with Antique Linen and Wild Honey Distress Inks. I set it aside to dry while I worked on the card base, but I went back to it and stamped stars around the image with Versamark Dazzle ink and heat embossed it with clear embossing powder. I then matted it on a Petite Scalloped Oval Large cut from Terracotta Tile cardstock. And before I forget, I dry embossed the Aqua Mist cardstock with the Textile Cuttlebug folder.
I tried to keep everything relatively neutral. The only non-neutral color comes from the red-orange of the Terracotta Tile. In my opinion, aqua and lavender are colored neutrals, but again, that’s my view.
I did some embellishing with Prima Say it With Crystals, scrunched seam binding, and a faceted button. I used sentiments from My Creative Time’s Piles of Smiles stamp set. I popped up the sentiment banner with dimensional adhesive, and added some rhinestones to bring in a little more lavender. Lastly, I rounded the corners with the .25” setting on my Corner Chomper and hit the entire care with Mister Huey Shine.
Thanks so much for coming by! Have a blessed day!


 Posts
Posts


