Showing posts with label Fresh Ink. Show all posts

Wednesday, April 17, 2013

Life is Sweet

Hello everyone! I told myself I would do a better job of blogging, and it helps that I have had moments of inspiration hit me here and there. I have one to share today that I really love, and I take a lot of comfort in the sentiment. Especially so, given the events in Boston on Monday.

DSCF2234

DSCF2236

I used, The Sweet Life, a multi-step floral set from Papertrey Ink. It builds the most wonderful cabbage roses. Next to hydrangea, roses happen to be my favorite flowers. The more hues of ink in ones arsenal, the more possible combinations. Personally, I like to make mine look as realistic as possible. I mean, I doubt you’ll see neon roses here. I guess it could be fun if you’re into that kind of thing.

Because I can’t be satisfied with less, I went back in with some paisley stamps from a Recollections cling mount set that I just love. And, I filled in the pattern further with the strawberry flower from Strawberry Patch. The dots are from Polka Dot Basics I. I used my Envelope Pattern backgrounder to add a little texture.

I stamped my sentiment on a strip of vellum and heat embossed it with some detail gold embossing powder from Recollections. I used the envelope pattern on the back of the sentiment strip because I felt it needed a little bit of color, and because, I just can’t leave well enough alone.

The panel was sewn to a Kraft base embossed with my Squared Lattice folder. And, to finish it off, I added some buttons threaded with Rustic Cream twine, and silk ribbon.

Alrighty, that is it for me! I hope everyone has a wonderful week. Keep the people of Boston in your thoughts. I thank you all for visiting, and I wish you a very blessed day!

Wednesday, September 26, 2012

Victorian Halloween

Good day wonderful people! I have another one of my vintage numbers to share with you all today. As I type this, I have the urge to add some glitter to it, but what’s done is done!

DSCF0338

DSCF0340

Okay, so I challenged myself to make a Halloween card without using traditional colors, and to also use some of the things that I’ve been hoarding. I’ve been on a bit of a, I need to buy this and this and that phase, and, I have to kind of lay off the buying because I’m going on vacation in November. Moving on!

For the first time in a long time, I made an odd sized card. The base is Sweet Blush and measures 3.75” x 5.5.” I basically made an A2 and shaved half an inch off. That keeps you from wasting cardstock.

All of the patterned papers are for Colorbok. I bought the Victorian Parlour 8” x 8” pad and the die cut accents from Jo-Ann this summer. Basically, I just picked some patterns that coordinated, starting with a brown scroll type pattern. I stamped Background Basics: Sheet Music with Crumb Cake ink on the pink doily paper. I wanted something a bit subtle. I stitched the papers together and then adhered them to the base.

I found some new (Well, new to me!) doilies at Jo-Ann a few weeks ago, and it' wouldn’t be one of my cards if I didn’t use one, so I took one out and gave it a misting with Boss Lady Mr. Huey spray mist from Studio Calico. Again, trying to bring in the pink more. Ohh, I did ink the doily with Antique Linen and just the tiniest amount of Vintage Photo Distress ink because white would have ben too stark for this card. I rarely, if ever, use white cardstock. When I do, you will know it!

From there, I adhered a large rose die cut and then I layered on the vintage postcard I printed from Beatriz Jennings Etsy shop. A little more stitching – to fully secure it. I added a little pearl flourish from Recollections across the bottom. I used some trim on the edge of the card. I really love this stuff. I need to get it in more colors.

To finish it up, I made a bow from natural jute ribbon and seam binding from Liz’s Paperloft Boutique. I glued one of the butterfly die cuts from the collection in the center. If you look closely, the little girl on the postcard is holding Jack – O – Lantern, so I found the perfect sentiment in All Around Halloween from My Creative Time. I stamped it with Soft Suede ink from Stampin Up. The very last touch was to swipe my Fresh Ink Paper White ink pad to soften the hard edges of the card. I decided to do this instead of Distressing it with Antique Linen. I wanted it to stay kind of light.

Thanks for stopping by! Have a blessed day!

Thursday, September 13, 2012

Birthday Wishes

Hello crafty people! I hope everyone is having a good week! I’m popping up today to share a number that I made for my mother’s birthday a few weeks ago.  I got to use some new to me goodies on it!
DSCF0302

DSCF0305

Okay, so there’s a lot going on here, as you can see. I would like to think that it’s organized and well put together, but I will let you all be the judge!

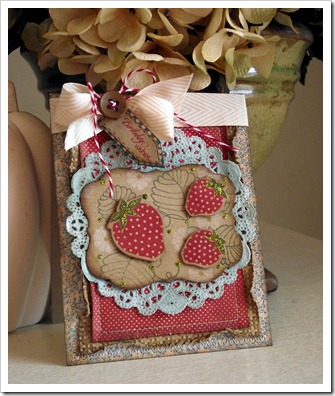
The base of the card is Kraft. However, I did something that I rarely do – I covered the entire base with a piece of patterned paper from My Mind’s Eye. For this card, I used paper from the Miss Caroline Dilly Dally 6” x 6” pad. I did quite a bit of inking. I used Antique Linen, Tea Dye, and just the tiniest bit of Walnut Stain Distress Inks throughout the card. I sewed the patterned paper front directly to the Kraft base with a perimeter zig-zag stitch.

Next, I cut a 3.75” x 5” piece of Kraft and embossed it with my Sizzix Square Lattice folder from Stampin’ Up. I’ve had this for a while, and just never got around to using it. I bought it during my style transformation, so it kind of sat in my little embossing folder crate. Anyway, I *think* I used the debossed side, and I sewed another piece of patterned paper to it. I then used my edge distresser to rough up the edges. This was adhered directly to the card base.

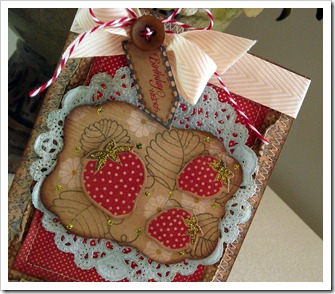
For my stamping, I used Teeny Tags from My Creative Time, and the Strawberry Patch dies and a Mat Stack 4 diecut from Papertrey Ink. The stamps I used were Strawberry Patch and Teeny Tag Greetings. The Strawberry Patch stamp set is kind of a double use set, it has stamps for those that like to color, and stamps for those that just like to stamp. Personally, I’m kind of in the middle. I would like to attend a Copic class, but they seem to avoid the South! Anyway, I used the leaf outline stamps, and stamped it on the diecut with Always Artichoke ink. I went back in with the large flower and stamped it with Paper White Fresh Ink. I colored in the center of the flower with my Spanish Orange Prismacolor Marker. After all of that, I used my Woodgrain Impression Plate to give it something a little extra.

This is where I am going to digress and let you all know why I tend to not video myself making cards. More often than note, they are very involved! But, I do have plans to make more tutorials! Back to your regular scheduled programming . . .

I diecut the the strawberries from Kraft and stamped them with Real Red and Always Artichoke inks. Then I adhered them to the Mat Stack with dimensional adhesive.

Now, putting it all together! I pulled out a doily and inked it really good with Baja Breeze ink. I did this to pull out the blue from my pattered paper. I adhered the mat with my strawberries with more dimensional adhesive. It wouldn’t be a card from me if I didn’t tie a bow. For that, I used some May Arts Chevron Twill ribbon. And, I secured my sentiment to it with a vintage button from Papertrey Ink, and Maraschino twine from The Twinery. Lastly, I added some Lime Green Stickles, cause you know I loves me some glitter.

Before I go, I have a little announcement. I have decided to step down from the My Creative Time Design Team. It was a really hard decision, but it was something that I thought over for a while. I sincerely love Emma and the ladies on the DT more than I can express. There aren’t many guys in this craft of ours, but they welcomed me with open arms. This doesn’t mean that I will stop using My Creative Time. A lot of my most favorite sentiment sets have a special place on my craft table.

As always, I thank you for stopping by, and I wish you a blessed day!

Tuesday, August 21, 2012

Best Witches

Hello beautiful people! I hope your week is off to a great start. Mine definitely is, thank you the the awesome comments yesterday, I really appreciate them!

How about a little vintage Halloween number today? What’s that? Yes? Well, I will surely oblige!

DSCF0236

DSCF0239

DSCF0240

Believe it or not, I don’t really celebrate Halloween. I do love Thanksgiving and Christmas though. Anyway, this came together better than I could have ever imagined. I am in love with silhouettes. I think they are classy and elegant, and when I was planning my projects, I knew I wanted to cover the witch with some Martha Stewart glitter.

I was shopping around for vintage/shabby crafting supplies and I came across some crepe paper trim. So, a light bulb went off and I thought, I bet I could make my own. And that I did. Super economical. I bought five colors for $6.45 – a total deal. I do regret not picking up the purple though. But, I will be making a trip back to Hob Lob this week so I might pick it up then. I used my sewing machine to stitch six strips of crepe paper together, and then I just cut it with my scissors. Really easy.

So, my card is a standard A2 – True Black from Papertrey. I adhered some of that star paper that I printed from the Teresa Collins Black & White Pattern cart to the bottom. It measured about 4.25” x 2.25” – the width matters more than the height because it will be covered. The top portion of the card is a piece of Stampin’ Up! Wisteria Wonder that I stamped with my acanthus background stamp. I inked up with Versamark Dazzle in Frost and embossed with clear embossing powder. It measures 3.75” x 2.25.” I cut a 4.25” x ,” strip from a diagonal stripe I found in the My Mind’s Eye Mischievous pad. And the vintage bingo card is a printable that I purchased on Etsy. It comes as a 8.5” x 11,” sheet and I trimmed them out. I inked it with Wild Honey & Black Soot Distress inks. I should mention that everything is sewed to the card, with the exception of the bingo card, I used some red liner tape to adhere it.

I tied a bow with some seam binding that I purchased from Liz’s Paperloft Boutique. I like mine crinkled. I found the frame and silhouette on the Happy Haunting Art Cartridge. Again, I tend to use my Gypsy whenever I cut, so shoot me a line if you want the file, but they were cut at 3.75.” I sprayed them with adhesive and covered them with Onyx and Sterling glitter from Martha Stewart.

Confession, I made a bit of an oopsie when I was sewing, so that is why there are buttons on the card. They are Papertrey and are stitched directly to the card with orange embroidery floss.

My sentiment is from My Creative Time’s new Treats For My Sweet stamp set. I stamped with Onyx Black Versafine ink. I stamped it on one of my favorite Cricut cuts from Plantin Schoolbook. I just love the shape of that tag. The pointed end helps it tuck nicely under the button when I secured them. Last touch was a little inking with my Slate inkpad from Impress.

Thanks for stopping by! Have a blessed day!

Wednesday, July 25, 2012

Papertrey Ink July Blog Hop

Okay, so I haven’t posted a card in ages. Basically, I’ve been quite the worker bee and I also might have had a fire in the backyard during the first week of the month that burned my cable lines. So yeah, but no matter, I have a card I quickly made once I got home from work today!!

DSCF0193

DSCF0197

I was finally able to order the dies that coordinate with Pretty Peonies, and I cannot be happier. I have said this before, but I am not a good fussy cutter. I also ordered like 4 new stamp sets! Might not sound like a lot, but homeboy here is on a budget and I can’t drop major dollars at Papertrey every month. I digress!

I trimmed a piece of Rustic Cream, which I am in love with, I cannot stress that enough, to 3.75” x 5.” I started off by stamping the solid peony from Pretty Peonies with Cameo Coral and Calypso Coral inks from Stampin’ Up. The yellow peony was stamped with Chamomile Fresh Ink from Impress.

Next, I stamped the largest leaf cluster from The Sweet Life with Lucky Limeade ink. I then went back in with the small cluster to fill in, but I did some stamping off and generational stamping to give my pattern more dimension and depth.

My third step was to use the medallion building stamps from Lovely Layers. I guess I should have mentioned this earlier, but I was kind of going for a vintage fabric kind of look. Anyway, I stamped the medallion with Mango and Chamomile from Impress, and Calypso Coral. After that I used the two small flower images from the Strawberry Patch set to fill in.

DSCF0199

I don’t know if this shows up in the pictures, but my the last thing I did was stamp the entire background with my Stampin’ Up Just Jeans background stamp. I inked it with Antique Linen Distress ink just to give it the slightest bit of texture, and to again, bring out that fabric look. I inked the edges with more Antique Linen and a little Tea Dye. I used my edge distresser tool to roughen up the edges and then I crumpled it up into a ball a few times. It’s all about texture people!

The rest of the card came together pretty easily. I attached my stamped background to a Kraft card base. I took it to my sewing machine and by the Grace of God, I had brown thread in my machine, so I went with it.

I diecut the frame from Lemon Tart cardstock and the butterfly from Kraft. I then ran the butterfly back through my machine with the woodgrain impression plate. I tied a bow with some Berry Sorbet grosgrain and adhered the frame and butterfly with dimensional adhesive. I embellished the butterfly with my Melissa Frances pearls, because I just can’t help myself, and that is was it.

Thanks for stopping by and I wish you all a blessed day!

Thursday, June 28, 2012

Hi

Howdy! I hope everyone is having an awesome week. I’ve been super busy with work, but I carved out a bit of time to make this card, and complete another (which you will see soon).

Today’s card is being featured on the Platinum Scraps blog. I encourage you to visit to see my design team member’s take on this week’s card sketch.

DSCF0169

DSCF0171

DSCF0172

I pretty much followed the sketch, but I wanted to do more than add patterned paper. Initially, I was going to do all of my pennants with ribbon, but I had these scraps laying on my work table, and I really like to use as much of my supplies as I can.

I really love using painted corrugated cardboard on my cards. It’s inexpensive and I think it packs a lot of punch. I tried to take good macro shots in order for you all to see the different colors. I painted it with acrylic paint that I bought from Jo-Ann. The colors I used were Vanilla, Lemon Ice, Grey, and Robbin’s Egg Blue. The green you see is the blue and yellow combined. I never imagined myself a paint artist, but I have a lot of fun when I do this. I’m sure you’ll see more of this in the future.

My card base is Rustic Cream from Papertrey Ink. I used the “Be Happy,” stamp set from the My Mind’s Eye Follow Your Heart collection to stamp the doilies and butterflies. The inks are Chamomile, Sugar, and Blue Sage Fresh Inks.

The patterned paper is also from the, “Be Happy,” collection. Again, I used scraps from previous projects. I find that I love this kind of color scheme, so I don’t mind using the same papers. The jute pennant is Offray. I took the pencil I keep in my craft caddy to curl the pennants and I used hot glue to secure them – it allows them to remain curled.

I round the corners of my cardboard element (and card base) with my Corner Chomper using the 1/2” setting and secured it with hot glue as well. Oh, I used Lemon Tart twill tape to tie a bow around the bottom portion. I also added an Aqua Mist vintage button that I threaded with some jute twine.

I used my Martha Stewart 3-in-1 Classic Butterfly punch to punch butterflies out of the same My Mind’s Eye Papers, and some Recollections yellow gingham. And to complete the card with a simple sentiment, I used some American Crafts foam Thickers in the Lullaby font. The color is Sunflower – a bit bright, but I can totally live with that.

That’s pretty much it. A pretty simple card to put together. I thank you for stopping by, and as always, I wish you a blessed day.

Tuesday, May 22, 2012

Get Well

Hey all! I have a super quick card to share today. A friend of mine commissioned a masculine get well card and this is what I came up with. I know that I struggle with making cards for men. I like to use ribbon and softer colors, and I don’t think that translates well for a masculine card!

DSCF0079

DSCF0081

I recently ordered the Pink Paislee Nantucket Collection. I’ve seen it used so many places that I just couldn’t resist it any longer. Now, because the colors of the papers in the collection were feminine, I couldn’t use them here, but I did get the boat from the ephemera pack. It’s loaded with so many die cuts that I cannot wait to use.

My paper came from the My Mind’s Eye Lost & Found Portobello Road pad. It’s an oldie, but definitely a goodie! I die cut a Label 4 from the patterned paper and a piece of Kraft to use as a backdrop for my boat. I inked around the edges of the larger label with my Slate Fresh Ink. It’s my new go to gray ink. Before I adhered my label, I did glue down a piece of burlap that I received from Liz’s Paperloft Boutique.

I stamped my sentiment from the WPlus9 Hope Seed Co. stamp set. I used another of my new inks, Blue Sage, also a Fresh Ink, to stamp it. I then trimmed it with my scissors.

Super quick card. I didn’t even have to change the thread in my sewing machine!!

Thanks for stopping by! Have a blessed day!